Playing with Pinholes: Turn an Empty Film Box into a Pinhole Camera
10 44 Share TweetMost of us Lomographers tend to stack up empty film boxes everywhere, wishing to recycle them in a clever way. Here’s just one of the many cool things you can do with them – pinhole cameras! Check out this easy tutorial on how to build your own 35mm pinhole camera with just a few basic things you can easily find at home!

This is what you’ll need for this easy project:
- An empty box of Lomography 35mm film or any other pack of three rolls (or a box approx 11×5cm)
- A fresh roll of 35mm film
- An empty roll of 35mm film with a tiny piece of film at the end coming out of the canister
- One paper clip
- A thick piece of aluminum foil (you can cut it out of an empty soda can)
- A needle
- Scissors and a cutter
- Black vynil electrical tape
- Adhesive tape (and also masking tape, if you feel like adding a little color to your pinhole camera)
- Pencil & ruler
- Stapler
First of all, you’ll need an empty box of film. I’m using one of Lomography's tri-pack boxes, as I have loads laying around in many drawers in my bedroom. Carefully open your box and lay it flat, then remove any traces of glue from it.


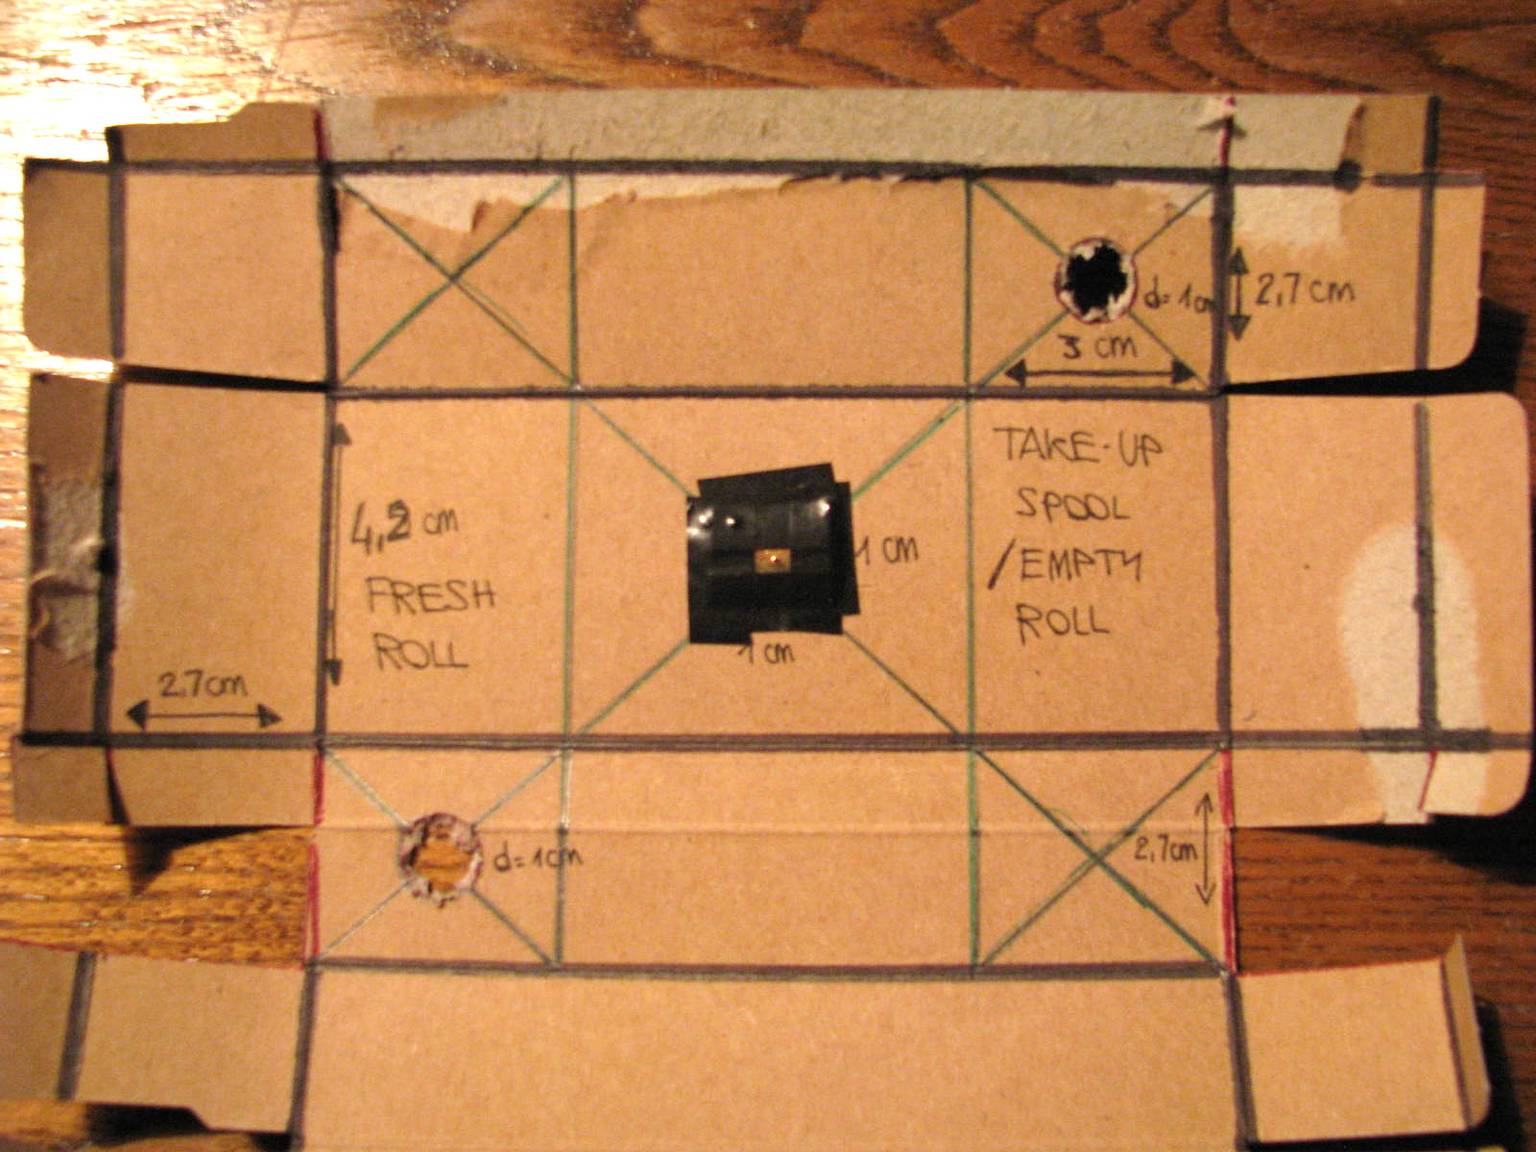
Copy this design on the back of your box (click here to see it bigger). You can see the measurements marked here in the bigger picture, or you can figure them out yourself using a film roll to see how to fit it perfectly in your box.

Draw the diagonals [see the green lines in the picture] to find where to put your pinhole (it will replace the red square in the center) and where to cut the two holes for the top of the two film canisters.
Cut along the red lines and cut out the parts colored in red.

Fold along the black lines. You can use a ruler to fold the cardboard straight. You can cut out the external parts covered by the ruler in these two pictures below, or you can fold them and glue them to the sides of your box as you like.


You will now need a piece of aluminum foil thick enough to pierce a sharp, tiny hole in it, and a needle. You can cut a piece of aluminum out of an empty soda can (be careful!). The window I cut out for the pinhole was 1×1cm, so if you follow my design and measurements you could cut a piece of aluminum a little bigger than it (mine is approx 1.2×1.5cm, but this really is up to you).The pinhole, as the name suggests, has to be really tiny: you will only have to push the tip of your needle through the foil. Remember this simple rule in pinhole photography: the smaller the pinhole, the sharper the picture.


Using black vynil elecrtical tape, tape the aluminum foil to the box (the central diagonals will show you where to place the pinhole). As some of the original folding lines are now in the middle of the sides of your box, you may want to use some tape [in my case, masking tape] to prevent them from bending.

You can now properly build your camera. I started folding the upper side of my box. I used both staples and tape to keep everything in place.

When your box looks somewhat like this one below, it’s time to get your rolls out.

You will have to tape your fresh film [the 100 ISO in my pictures] to the last bit of the old roll (the 200 ISO in my pictures). To do so, you will first have to take a fresh roll of film and cut the leader out.
The new film must be placed with the top of its canister on the bottom, unless you wish to take redscale pictures. In case, you will have to place the new film with its top facing the upper side of your box, and you will have to pierce a hole on the upper left side of the box (instead of the lower left side as marked in my design).


You can now load the film into your soon-to-be pinhole camera so that the two tops of the canisters come out of the two holes we cut out in the box. Now close the back door using black vynil tape and tape any possible hole or slit on your camera to make it light-tight (use black vynil tape first, then you can add masking tape, stickers, anything you like to customize your camera).


You can now fit the paper clip in the top of the empty canister to use it as your own advance wheel. After each shot you will have to turn the paper clip counter-clockwise twice to move to the next frame

Every camera needs a shutter, and so does your brand new pinhole camera! You can use a piece of black tape that you can remove whenever you want to expose your film and then put back in place before moving to the next shot, or you can try to add a sort of a slide shutter to your camera like I did. The best thing about sliding-shutters is that you can also use them as color filter holders!
So here’s how the camera looks when the shutter is closed… and then when it is open!


Now you’re ready to take your camera out and take some cool pictures, just remember that you will have to turn the paper clip counter-clockwise twice each time you take a picture to advance to the next frame. You will also need to hold your pinhole camera still when you take a photo (you can put it on something steady like a table, a stack of books…).
You can print this Exposure Guide which comes with the Diana Multi Pinhole Operator and keep your shutter open according to the amount of time stated in this useful guide.

Now you really are ready to shoot – Have fun with your new pinhole camera!
written by sidsel on 2012-05-02 #gear #tutorials #diy #pinhole #camera #tutorial #tipster #how-to #film-boxes #playing-with-pinholes #35mm-pinhole-camera


10 Comments