Beyond the Blues: Van Dyke Brown Printing
4 43 Share TweetMany of the most popular alternative processes in use today are variants of the non-silver processes developed by Sir John Herschel in 1842 and they are among the oldest of all photographic processes. The first of these, cyanotypes, was previously discussed in a recent tipster — “Beat the Blues: Making Cyanotypes”. Another process, Van Dyke Brown Printing, is nearly identical in simplicity, low cost technique but yields a rich brown color as opposed to the blue of cyanotypes. But, if you’ll ask me, why not do both? Check it out.

Lomographers are unique amongst photographers because we are never satisfied—nothing is ever complete! There’s always something else to try, another way to distress our film or modify our cameras. We are always searching and one of our most common phrases is “What if…” So when I first learned how to make cyanotypes and Van Dyke Brown prints, one of my first thoughts was what if you combine the two? So I did.
If you read the earlier Tipster on cyanotypes, then you know just about everything necessary for making brown prints. The process is the same, the chemistry is nearly so, and except the added step of fixing the print, development is also the same. Like cyanotypes, you can purchase the chemicals in kit form, in a pre-mixed ready-to-use solution, or you can even make it yourself. (In the latter instance, there is considerable savings in cost when you make it yourself.)
Here’s how:
Solution 1: Dissolve 10 grams ferric ammonium citrate in 30 ml distilled water.
Solution 2: Dissolve 1.5 grams tartaric acid in 30 ml distilled water.
Solution 3: Dissolve 4 grams silver nitrate in 30 ml distilled water.
Combine the 3 solutions and stir well. Add enough distilled water to make 100 ml of solution. The solution will keep for several weeks if stored in a cool, dark place.


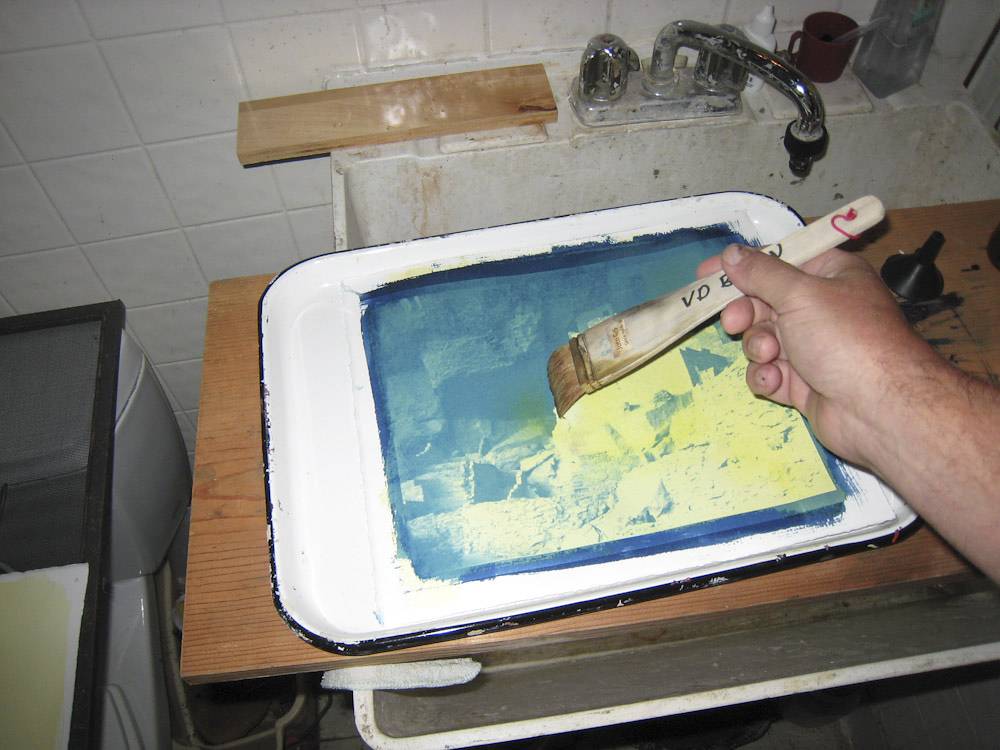
Inside a dim room, coat the paper or other medium with the solution using a foam or Japanese Hake brush with horizontal and vertical strokes, making sure to coat the paper evenly (unless, of course you don’t want the print to be even). Set aside to dry in a dark place or use a hair dryer on gentle.
Sandwich the negative with the sensitized and clamp in a contact print frame or press under the glass and set under strong UV lighting, such as the sun, to expose the print. (As in cyanotypes, you are making a contact print so your negative needs to be a suitable size: either larger format (minimum 4 × 5) or a digital negative made by printing a reversed black and white image on Pictorico Premium OHP Transparency Film.)
Here, in Northern California, in bright sunlight, brown prints generally take 1 1/2 to 2 minutes exposure time. The edges of the image not covered by the negative will rapidly turn a rich, reddish brown and will continue to darken and crystals will start to form. If you have a contact print frame you can check the exposure out of direct sunlight by opening half of the hinged back plate and carefully lifting the edge of the paper from the negative. The shadows should be a rich reddish brown and the highlights must be yellow.


Wash the exposed print in tap water for several minutes, then fix in a very thin solution (10:1) of photographic fixer or a solution of 4 heaping teaspoons of sodium thiosulfate dissolved in 1000 ml water. The image will turn from reddish brown to dark brown and the highlights will clear. The image will turn lighter overall. Wash under running water slowly for 15 minutes and set on a screen or hang to dry.
And that’s it! You’ve made a Van Dyke brown print!


But why stop there? If you’ve tried making cyanotypes you probably have a stack of cyanotype prints that aren’t quite right for one reason or another. Just make sure those prints are completely dry so you can re-coat them using the Van Dyke Brown sensitizer. Afterwards, set in a dark place to dry.
Then, in a dim room, align the original negative with the cyanotype image and tape the negative in place, load the paper and negative in a contact print frame and expose in sunlight and develop just as you would a normal brown print.


Talk about accidental images and embracing the unexpected! Have fun!


written by kdstevens on 2011-09-07 #gear #tutorials #tutorial #tipster #hand-craft #contact-printing-large-format-historical-process-historic-photographic-process-alternative-process-homemade-photographic-emulsions-brown-printing-blue-printing-hand-coated-paper-digital-negative-contact-print-kallitype-argentotype-sir-john-herschel


4 Comments